12 Ways to Make an Airport Express More Reliable

So you've built a multi-room AirPlay setup; an Airport Express in every room hooked to a killer amp.  It's all working just great, but then just as you're about to woo the girl of your dreams by playing "Wonderful Tonight" simultaneously in every room of the house, you get the dreaded 'drop-out' or worse still, 'Bedroom Speakers' disappears from the speakers menu of your iPhone Remote App!

By and large, if your network is configured properly, and your Wifi network isn't stretched, AirPlay works just fine.  However, this blog post aims to list the top 10 things that we have found can improve AirPlay performance, particularly with AirPort Expresses.  Hope you find them useful:

1. Check your firewall settings

If AirPlay doesn't work at all, you have a firewall issue.  Windows Firewall (and other third party software) aggressively blocks incoming ports that AirPlay relies on so ensure you leave exclusions open for your AirPlay devices.  On the computer that is running iTunes, ensure at least the following ports are open bidirectionarlly:

TCP: 80, 443, 3689 (for Remote)

UDP: 5353

For ease, unless you are paranoid about security, you can open all ports to and from your AirPort Express devices, or define "allow all" rules for your internal subnet to talk to itself.

2. Choose a clear channel on your WiFi network

One major cause of drop-outs when trying to stream audio or video over Wifi is poor signal strength.  When Wifi routers start up, most scan the Wifi frequency range to look for an unoccupied area in which to sit.  They then set their channel to correspond to this area.  The problem is that things change - eg channel 5 was fine at 2pm, but then the  neighbours get home from holiday, turn their Wifi on/off and bam, you end up conflicting for the same frequency which can cripple your bandwidth.

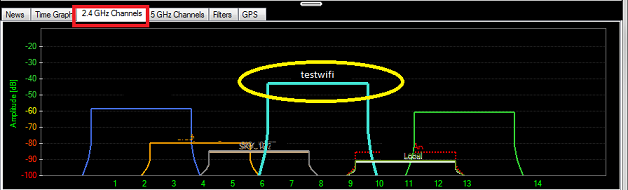
Use an app like 'inSSIDer 2.0' to view the Wifi frequency spectrum.  Sample it over hours, over days - look for patterns and find out which part of the frequency spectrum is the least crowded.  Then log on to your wifi router and force the channel to correspond to this range.  Keep checking back over time to make sure you still own your frequency space!

Our test wifi "testwifi" is shown below with a clear amount of frequency space around it lowering the risk of interference from other wifi sources:


3. Switch from the 2.4Ghz range to the less crowded 802.11n 5Ghz range

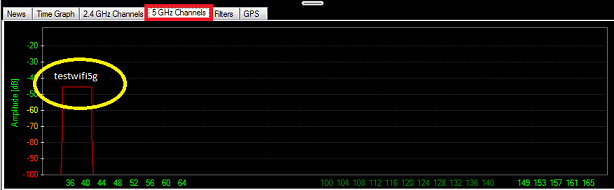
Just because you bought an 802.11n compatible Wifi router, doesn't mean you're actually using it!!!!  Many routers come configured by default to use g/n compatibility mode which actually means they run in the 2.4Ghz range.  Everybody's using this range so it is the most crowded and therefore must susceptible to interference.  Log in to your router and switch from mixed mode to the dedicated 5Ghz (n) mode.  

Unless your neighbours all read this, you may well end up (as I do) as the only 5Ghz user so you can enjoy the 5Ghz bandwidth to yourself!!  See the inSSIDer graph for the 5GHz range in my location below:


4. Go wired instead of wireless, or use a HomePlug

If you have continual problems with Wifi AirPlay devices, consider switching to a wired network instead.  For example, if you have low signal strength in an area that you wish to place some AirPort Express attached speakers, either plumb some CAT5 Ethernet cable in or install a couple of HomePlug devices.  A pair of these can be bought from Amazon for 40UKP, are easy to set up and don't suffer from the same types of interference that Wifi does.  Whilst they make for a less elegant/compact solution (two boxes instead of one!), they are invaluable way of getting over your Wifi media streaming woes.

5. Use static IP addresses instead of DHCP

In this blog, we're looking at ways of minimising outage; reducing reasons why an Airport Express can drop off a network, temporarily or permanently!  DHCP is a great protocol, however, in our testing, some Airport Expresses, particularly the early ones, would give up the ghost if they couldn't get an IP address over wireless rapidly.  We eliminate this by always giving Airport Expresses static IP addresses removing the requirement for a DHCP handshake and making you know with certainly what IP address they are using.

6. Use up-to-date firmware

Sounds obvious but is worth double checking - always use the latest firmware that is available for your individual devices.  The early Airport Expresses (the ones that don't support 'N') should be running at least firmware 6.3.  The latter 'N' Airport Expresses should be running 7.5.2 or later.

7. Continuously ping your Airport Expresses

This one is slightly controversial, however, in our experience,  Airport Expresses that are on the edge of our wifi network stay up for longer when we continuously ping them, eg

ping 10.0.0.205 /t

... where 10.0.0.205 is the address of the AirPort Express.  There isn't much science behind this, other than we wonder whether the AE's go into a power conservation mode if they are not used for a while and the ping prevents this.  However, this is just conjecture!

8. Synchronise your AirPort Express time using NTP

Some forum members are convinced that synchronised clocks are required for multi-room streaming.  We are less convinced, but configure it out of habit anyway.  In the AirPort Utility configuration, under AirPort / General, click 'Set the time automatically' and then enter ensure that it is set to an NTP source that is reachable from that device.  If you have a Domain Controller in your network, set it to the domain controller.

9. Ensure all your devices are on the same subnet

AirPlay devices communicate using broadcast addresses which must reside within the same network subnet.  For the vast majority of home users this is not a problem, however, if you have multiple routers or configure your wifi router to create a separate network off of your main wired network then you will potentially be operating two subnets across which AirPlay cannot traverse.  Create a flat network by ensuring all your network devices operate in 'bridged mode' except for the router that connects to your internet connection.  Check the subnet masks of each computer network adaptor and network device to ensure they are consistent.

10. Turn off IPv6 on your computer

AirPort Expresses, by default, advertise their services (including AirPlay services) as being available on both IPv4 and IPv6 addresses. If you have IPv6 active on your computer, it is possible that iTunes will try to use the IPv6 stack to communicate with your Airport Express.  Unless IPv6 is configured correctly, this may not succeed, or at least is a lot harder to root-cause-diagnose unless you've read Dummy's Guide to IPv6!

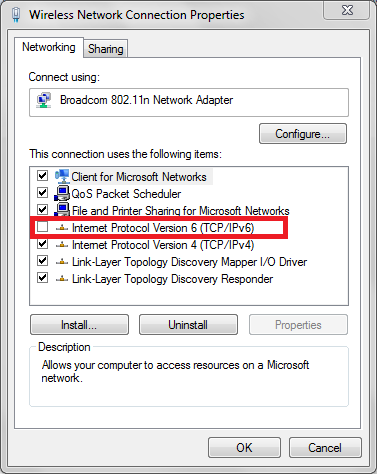
Instead, simply turn off the IPv6 stack on your computer by following these steps:

    1. Click Start / Control Panel
    2. Click 'Network and Sharing Center'
    3. Click 'Change Adaptor Settings'
    4. Right click your network adaptor and select 'Properties...'
    5. Untick 'Internet Protocol Version 6 (TCP/IPv6):

11 If all else fails - analyse your mDNS (multi-cast DNS) traffic

AirPlay devices advertise themselves using the mDNS or multicast DNS protocol.  You can inspect this using Wireshark on a Windows PC where you will see periodic requests for services from your iTunes machine and multiple responses from the AirPlay devices on your network.  We use the wonderful "mDNS Watch" which is a free app available on iOS to understand how mDNS is working on our networks.  

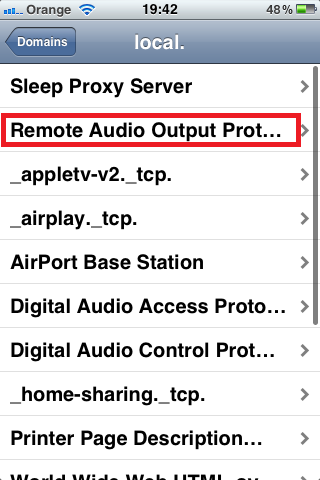
Once installed, open the App, and then click 'local.', then 'Remote Audio Output Protocol' as follows:

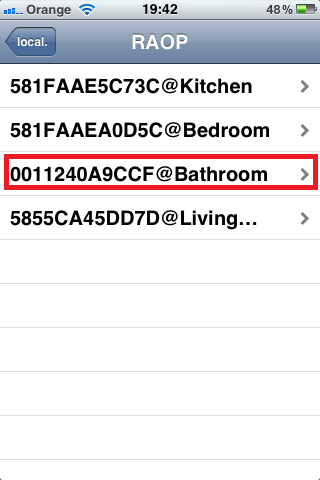
You should now get a list of all the devices that are advertising themselves as AirPlay audio devices.  If you are missing a device from this list, then there is a connectivity or configuration issue preventing it from advertising itself on the network.  This could be any of the issues above, however, if mDNS Watch can't find it, then there is no way that iTunes will so at least you know the problem is outside of the iTunes domain!

Once you have found the AirPlay device you are interested in, click on the device name, and you will see further information about that device:


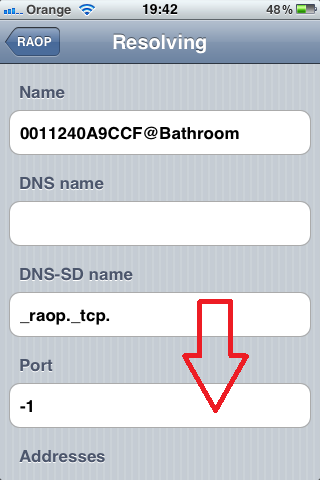
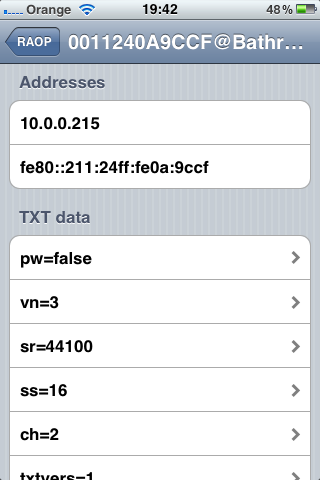
Here you can see capabilities metadata associated with the device (eg sr=44100 = the maximum sample rate available).  More importantly, you can see the IP address that the AirPlay device thinks that it should be listening on and it's port.

Ensure that at least one of these addresses is on the same subnet as your iTunes instance.  You will also notice in the example above, a 169.254.x.x address and an IPv6 address.  I haven't worked out what the 169.254.x.x actually corresponds to; the AE is configured to create a new wifi network but connect into my core network in bridge mode.   The IPv6 address is advertised and is valid, however, will not get used unless your computer is also configured with an IPv6 address.

So I realise number [11] isn't exactly a quick fix way of improving the performance of your AirPort Expresses, however it's a useful way of diagnosing AirPlay issues


12 Switch or upgrade your wireless router

If you only get issues when using wifi (and not, for example, if your AirPort Express is wired into your LAN), then focus more on your wireless router.  We saw a Netgear WNDR-3400 router which was giving its owner lots of AirPlay grief - airport expresses just disappearing off the network.  We upgraded the router to use the brilliant opensource DD-WRT firmware instead of the Netgear stock and all the AirPlay issues disappeared overnight.  Highly recommended if DD-WRT supports your router model.


Any more?!

Hope these suggestions have been of use to you. If you know of any others, please leave me a comment and I'll add them in! Happy Air-Playing....!

Use iTunes to create a Sonos like setup for a fraction of the cost!

Play all your digital music all over your house wirelessly!

This is Sonos's slogan.  Sounds awesome, and with Sonos, this is exactly what you get.  However, a typical Sonos system becomes very expensive very quickly.  For example, let's say you would like music in just two rooms - your living room and, say, the bathroom.

With Sonos, you need the following components:

  • A Sonos ZP90 Zone Player - connected to your existing living room hifi - £279.95
  • A Sonos S5 Wireless Music Player - for the bathroom - £349.95
  • A Sonos Zone Bridge - for creating your Sonos wireless network - £39.95

The above prices are based on Richer Sounds as of mid July 2011, and even from Richer Sounds, known for their low prices, this totals £670 for audio in just two rooms!

You can build virtually the exact same system based around iTunes for a fraction of the cost and with the added benefit of using your existing iTunes library and supporting video as well!

Let's see how!

The iTunes / iHomeServer version

The image below shows the system we will be building:


So what have we got?

1. Windows Home Server

Well, we say Windows Home Server, but this could be any old computer you have lying around.  It doesn't need to be particularly high spec, but any computer bought in the past 5 years should do fine.  You can run any recent Windows operating system - ideally something like Windows Home Server or Windows Server 2008 would make a scalable home server which can power all your future needs, however, if your budget is tight, use which over OS came with the computer, eg Windows XP or Vista.  If you are using Windows XP, make sure you use the Professional version so you can use remote desktop to administer the box remotely.  You can spend money here if you like - buying RAID'd hard drives to add resilience and performance is always a good idea, particularly if you plan on using this machine for HD video streaming.

The idea is to run this server headless, i.e. with no monitor, keyboard or mouse, therefore it can be located anywhere you like - eg in an attic, basement or even a cupboard.  I always prefer wiring my media servers into a physical ethernet network (in my case a gigabit network running through most of the house) as despite the claims of most wifi hardware vendors, wifi never has the availability or bandwidth of wired networks.  Therefore, wire as much in as possible!

I suggest you perform a clean installation of the OS, rather than re-using an existing installation, to ensure that you have the bare minimum installed on the machine.

Once set up, install iTunes and set your media collection up as normal.  Setup iTunes home sharing and authorise it to use your iTunes account so that your purchases and media can be shared across your home media network.

Because you want to use iTunes as a server on a headless computer, I recommend you install iHomeServer next. iHomeServer allows iTunes to run as a background service that will automatically start when the computer boots up and does not require a user to be logged in to the console.  It also scans so-called 'watch folders' for new or modified media (audio and video) and keeps iTunes up to date.  This in turn keeps your iTunes media collection always in sync with the media stored on your server, and available for home sharing or streaming via AirPlay.  For more information on setting up iHomeServer follow this link.

2. Living room - Apple TV 2

Why spend £280 on a Sonos media player for the living room, when an Apple TV will stream just as well to your living room AND do high definition video as well for just over a third of the price!  Seems like a no brainer to us (plus the Apple TV's look better).  Apple TV 2 supports AirPlay from iTunes and iOS devices and therefore is a perfect partner to our iTunes Home Server.

Simple wire up the Apple TV 2 to your existing TV and hifi, and you can stream to the living room for around £99.


3. Bathroom - Apple Airport Express

Sonos offer a Sonos S5 Portable Wireless Music Player for around £350.  This would be ok for the bathroom, however, I'd be worried about putting something that expensive in an area with so much potential for water damage!

My alternative was to put some speakers in the ceiling - Water Resistant 6.5" 100W White Speakers which were only £34.95 from Amazon for a pair.  These couple very well with something like a solid-state MUSE Class T Amp Integrate Amplifier Tripath TA2024 which are £30-40 from ebay, and which are so small that they can be embedded in a timber wall frame panel making everything neat and hidden!

I connect my T-Amp directly to an Airport Express - these can be bought newfor around £80 (eg PC World) or on ebay for around £50 delivered and are the ideal music streaming partner for iTunes as they support AirPlay, Apple's music streaming protocol. 

Obviously this set up can be replicated in other rooms of the house; I have this set up in the master bedroom and the kitchen and each zone costs approximately £100-£150 to set up with wifi streaming and iPhone remote control which is around a third of the cost of the Sonos version. 

4. iPhone / iPod Touch / iPad / Laptop

Sonos offers a free App for iOS users to control their Sonos music systems from, eg, an iPhone.  In our iTunes home media network, iOS devices can work in two different ways:

4.1 - iPod streaming from iTunes

All iOS devices come with iPod functionality for music and video built-in.  This can obviously work on local media stored on the device, or content sync'd from iTunes.  In the latest versions of iOS 4.0, Apple allows the iPod functionality to leverage the Home Sharing function of iTunes over a network.  Therefore, in our home media network, our iOS devices can stream directly from iTunes running on iHomeServer.

This would stream content directly to the iOS device and play it on the iOS device's screen / speakers.  However, having other AirPlay enabled devices on the network allows us to then push this media onto a further iOS device, eg use the iPod Video feature on my iPad to stream media directly from the central iTunes server hosting the central content library and then AirPlaying the audio from the iPad to a proper pair of speakers.  Whilst this sounds bizarre, it would allow you, for example, to watch a video on your iPad in the bath with the sound playing through the overhead speakers.

The same applies for another instance of iTunes streaming media from our iTunes home server.  As long as all the iTunes are connected to the same Apple Home Sharing network username and password, you'll be able to browse through your central iTunes media library from a laptop running a separate instance of iTunes.

4.2 - iTunes pushing to iOS

I have just described 'pulling' media stored on an iTunes Home Server from an iOS device through iTunes or an iPod app on an iOS device.  However, an arguably more interesting model is to 'push' media from an iTunes Home Server to an AirPlay device.

Install the 'Remote' app from the Apple App Store.  This is a fantastic free app for iOS devices that allows you to remote control an iTunes instance from an iOS device, including remote controlling AirPlay functionality.  So from my iPhone, I bring up the Remote app, connect to my Home Server iTunes library, click an album and then click on the AirPlay icon and select my Bathroom speakers to stream the album to the bathroom speakers.  Because the stream is directly from my iTunes Home Server to the Bathroom speakers, I can turn my iPhone off and the music obviously keeps playing.  I can then choose the 'multi-speaker' option and instruct the server to stream music to both the bathroom and the living room.

This also works for video, so I can use the Remote app on my iPhone or iPad to find a move that I want to play and instruct the server to stream this to my Apple TV device.  This all just works.

4. Apple Fan Boy?

I apologise if I sound a bit like an Apple Fan Boy - this is actually not the case!  I believe Apple make high quality hardware and perform exhaustive testing so that devices 'just work'.  I actually (and please don't flame me) prefer Windows 7 to OS X - it just integrates into my Windows server environment so I more or less exclusively run Windows 7 on my MacBook! However, Apple does provide a very effectiveness way to create an integrated home media network and this is what drives my enthusiasm!

5. Conclusion

So, in conclusion, Sonos provides a series of hardware products that can create multiroom audio streaming.  iTunes can be used to create an equivalent system that supports audio and video, so let's see how the costs compare:

5.1 - Sonos costs

  • A Sonos ZP90 Zone Player - connected to your existing living room hifi - £279.95
  • A Sonos S5 Wireless Music Player - for the bathroom - £349.95
  • A Sonos Zone Bridge - for creating your Sonos wireless network - £39.95

TOTAL = £669.85 for two zones; adding an extra zone for another room in the house costs around another ~£350 including amp and speakers.

5.2 - iTunes Home Server costs

On the assumption that you already have a spare PC running Windows, you can create a functionally equivalent home set up that uses iHomeServer to run iTunes as a server for the following:

  • iTunes - free from Apple
  • iHomeServer - £20.00 from bizmodeller.com
  • Computer + OS - assume re-use an old PC in the house, but preferably upgrade to Windows Server if possible
  • Apple TV, for streaming to the Living Room - £100, eg from Currys
  • Apple Airport Express, for streaming to another room such as the Bathroom - £80 from PCWorld
  • MUSE Class T Amp Integrate Amplifier Tripath TA2024 - £30 from eBay
  • Water Resistant 6.5" 100W White Speakers for the speakers - £35 from Amazon
TOTAL = £265 for two zones; adding an extra zone for another room in the house costs around another ~£145-180 including amp and speakers. 

5.3 - Savings

Based on the costs above, you can save approximately £414 on a two zone multimedia streaming solution, which means the iTunes model works out at about 38% of the cost of the Sonos solution with the added benefit that it supports streaming video and TV!
 

Where are the iHomeServer for iTunes log files?

Lots of people have asked us where iHomeServer puts its log files.  The answer is that most important messages are written to the Windows Application log file so you can use Event Viewer to look at the main events that have taken place or major errors.

A much more verbose log is written to:

%APPDATA%\iHomeServer (for iTunes)\iTunesHomeServer.log

This will use the user under which the iHomeServer agent is running, so if you are running under the iTunesUser account, the log file on a standard Windows 7 installation will be here:

c:\users\iTunesUser\AppData\Roaming\iHomeServer (for iTunes)


How to run iHomeServer for iTunes as a non admin user

When you install iHome Server for iTunes, you specify the user account under which you wish iTunes to run.  Of course, you can use your normal Windows account to do this, in which case, when prompted, just enter your account name in the form COMPUTERNAME\USERNAME, eg:

WIN7-COMPUTER\Joe.Bloggs

Enter your Windows logon password, or if you don't, leave the password fields blank.

However, it makes sense to set up a brand new user to act as your system iTunes account.  In this case, follow these steps which are applicable to Windows 7.  If you are using a different operating system, then there may be minor variations:

1. Go to the "Computer Management" applet which you can find under Control Panel / Administrative Tools: 


2. Create a new user account for your iTunes Home Server, specifying a password.  Ensure you uncheck 'user must change password on next logon' and make the account's password never expire:


3. Now comes the tricky bit.  Default Windows security prohibits non adminstrative accounts from creating cross-process calls to COM objects unless the code is running interactively.  Because iHomeServer runs as a Windows Service, under the account you have just created, you will get errors in the event and error log when you start iHomeServer because it will not be able to access the iTunes application.  The errors will look like this:

15/07/2011 18:11:49 FATAL ERROR: Cannot create hook to iTunes - System.Runtime.InteropServices.COMException (0x80080005): Retrieving the COM class factory for component with CLSID {DC0C2640-1415-4644-875C-6F4D769839BA} failed due to the following error: 80080005.
at AddLibraryToiTunes.Program.DoIncremental()
15/07/2011 18:11:49 Stopped service; iTunes killed

4. To get around this, we need to change some permissions.  Open up 'Component Services', again from the Administrative Tools folder of Control Panel.  Right click the shortcut and click 'Run as administrator' to ensure you are running as an admin.

5. Click down the tree as follows : Console Root / Component Services / Computers / My Computer / DCOM Config

6. Click the View, and click 'Detail'.  Your screen should look like this:


7. Scroll down the list until you find "iTunes".  The GUID should be {F98206B5-F052-4965-9FA0-85F61BC3C19D}

8. Right click this item and click 'Properties':

9. On the "Security" tab, click "Customise" for "Launch and Activation Permissions".  Then click 'Edit...'

10. Click 'Add', then search for the iTunes user you created in step 2.  Click 'OK', then ensure that Allow Local Launch and Allow Local Activation are both set as follows:

11. Click 'OK' then do the same for "Access Permissions".  Add your iTunes user and ensure Local Access is ticked.

12. You then need to repeat steps 8 through 11 for the component "iPodService".  This GUID should be {250DD19F-6E7F-4BA3-9E1B-69E6CDC52F30}

13. Click OK and close Component Services

14. Before you start the service, ensure you have logged on locally as your new iTunes account and set up iTunes as per the setup guide here.

15. Finally, go to Control Panel and the Services applet.  Find the 'bizmodeller iHome Server' service and change the permissions to use your iTunes account. Then restart the service

iTunes should now be running under a dedicated iTunes account that does not need to be a member of the administrators group!

Welcome to the bizmodeller blog

We have just launched this blog to post random musings on various subjects that we find interesting. Some may be related to our products and services but generally they will just be the things that make us scratch our heads and go : that's odd, that's cool or that's fascinating!