HOWTO: Manually uninstall the iHomeServer Add-in on WHSv1

It is important when upgrading any add-in on Windows Home Server v1 that you uninstall the previous version of the add-in before copying the updated add-in file to the server's add-in folder and installing any newer version.  This is a long lamented and unfortunate design decision within WHSv1 which has fortunately been resolved in Windows Home Server 2011.

If you find yourself in the situation where you have attempted an upgrade without first uninstalling the previous version, you need to log into your server via RDP (Remote Desktop Connection) and manually uninstall iHomeServer from the Add/Remove Programs applet of your Control Panel.  Once uninstalled, you then need to use the registry editor (regedit.exe) to remove the relevant Add-In's registry key under HKEY_LOCAL_MACHINE\SOFTWARE\Microsoft\Windows Home Server\RegisteredAdditions\

If you require step by step instructions, please look at this blog which gives an example for another add-in.  Simply follow these instructions, but apply it to iHomeServer instead of their example add-in:

http://www.homeserverland.com/wiki/index.php/Windows_Home_Server_Add-in_Manual_Uninstall_Instructions

If you have any further difficulties, please feel free to email support at [email protected]


HOWTO: Fix the "Add-in is already installed" error message on WHS v2011

iHomeServer v2 updates (for Windows Home Server 2011) should normally be installed simply by downloading and directly running the iHomeServer.wssx file from the Downloads area of the bizmodeller.com web site.  The installation process will automatically uninstall any previous versions and update your system to the latest version.  Any settings will be preserved including the registration of which user account will run the iHomeServer service.

However, once in a while, we receive a support ticket from a user who has had problems upgrading to the latest version. Typically the error says "The Add-in is already installed":


This is usually because the user has tried to remove iHomeServer from WHS by using Control Panel's Add/Remove programs instead of using the WHS Console - this can be confusing because this was the way you had to remove iHomeServer v1.  However, you never need to uninstall iHomeServer v2 from either WHSv1 or WHS2011 by using Add/Remove programs.  Instead, please click the appropriate 'Uninstall' button from the WHS Console.  This can be found in 'Settings' under the Addin link in WHSv1 or on the main Add-in tab in WHS 2011.

If you have uninstalled iHomeServer via Add/Remove programs on WHS 2011, you will likely receive the above error message if you then try to install a new version of iHomeServer via the WHS Console.

To resolve this, simply log back into the the WHS 2011 Console, click the Add-in tab, click 'iHomeServer' and click Uninstall (even though you have already uninstalled iHomeServer from Control Panel Add/Remove programs).

This will unregister the iHomeServer addin with WHS and allow you to reinstall the latest version.


New: WHSv1 iTunes Installer - free tool to help install iTunes on WHS v1 without Orca!

We've had a lot of emails from users of Windows Home Server v1 who have tried to install iTunes on their servers only to be met with an error saying that the Apple Mobile Support requires Windows XP Service Pack 2 or higher.

There are many posts on many forums which give detailed instructions on how to get around this by using Orca to edit the Apple MSIs and remove the installation launch conditions.

We have put together a small free tool that automates this into a single click.  Once you have downloaded the  "WHS iTunes Installer", you will be asked to point the tool to the iTunes Setup file you downloaded from the Apple Web Site (iTunesSetup.exe).  The tool will then start the installation and remove the Service Pack 2 condition on-the-fly when required.  There is also support for upgrades, if you use the Apple Software Updater to download iTunes instead.

Download by clicking the link below ...  and please post feedback to this blog!


Download WHSv1 iTunes Installer (32-bit) - 25.6kb


Steps:

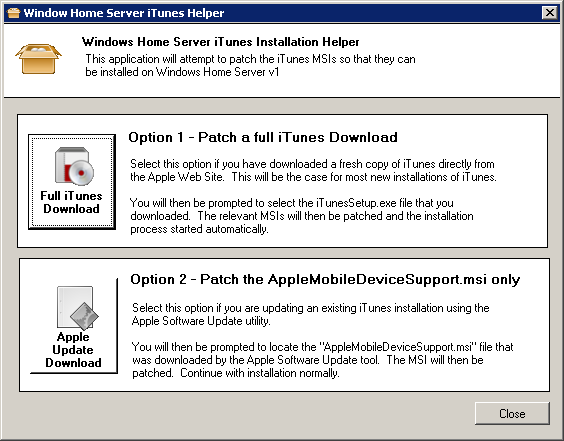
1. Welcome Page

Select "Option 1" if you are downloading directly from the Apple website for a new installation.  Select "Option 2" if you already have the separate iTunes MSIs in a folder somewhere and you just need to patch the AppleMobileSupport.msi
 

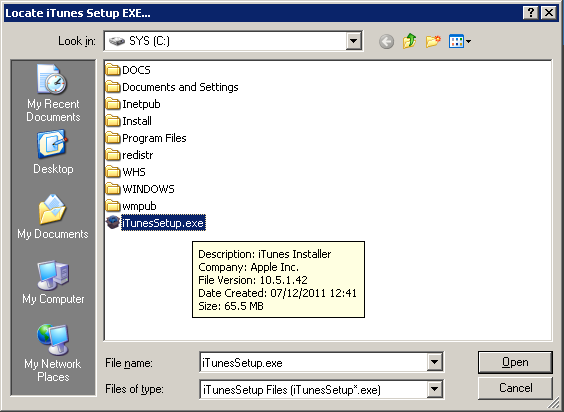
2. Select iTunesSetup.EXE

Assuming you chose Option 1, you will then be prompted to select the iTunesSetup.exe file that you downloaded from the Apple web site:
 

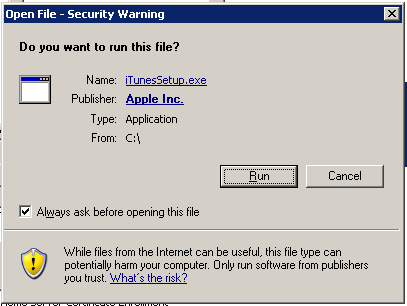
3. Installation ....

The tool will now launch the Apple installation program so click 'Run' to start the process:
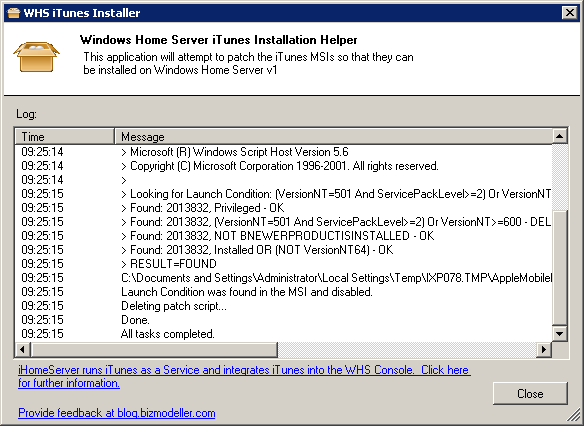
4. Patching ....

The tool will monitor the installation in the background for when the iTunes setup program has extracted the MSIs.  When the MSIs are available, the tool will automatically patch the AppleMobileDeviceSupport.msi in the background:
5. Patching Complete!

The tool will notify when patching is complete:


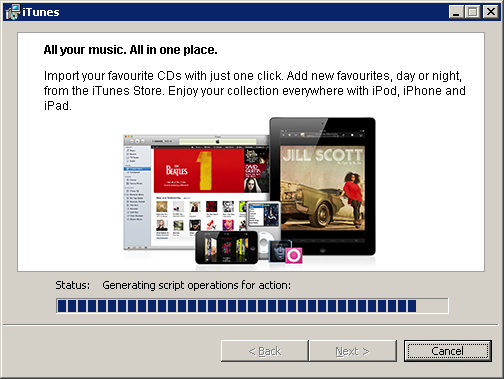
6. Continue iTunes installation....

The iTunes installation should now be continued normally:
 

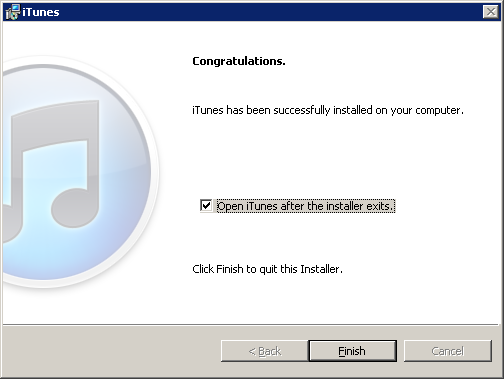
7. iTunes successfully installed!

If all went well, iTunes will now be successfully installed on your Windows Home Server v1 server:


Please let us know how you get on with the tool by posting comments below!

How to use iHomeServer with network drives or DriveBender disk pools

We have had quite a few users recently who have been unable to get iHomeServer to index content on network drives or local DriveBender storage pools.  The symptoms of this are that you can add and view files in iTunes that are stored on a remote / network or DriveBender drive when you are running iTunes interactively, however, when you run iTunes via iHomeServer then you can no longer add new content and existing content may not be available within iTunes.  Some users have also had problems seeing cover art and other metadata when they have pointed their iTunes to an iTunes library on a network drive.  You may see these symptoms immediately, or after a reboot or even intermittedly.

We posted a blog post a while ago about File Not Found errors similar issues and it is the same root cause problem here.

Windows Services cannot reliably see mapped network drives.  There are many Microsoft articles explaining why, but in essence, any network drive letter is tied to a Windows user session and is not guaranteed to be available to services which run in their own user sessions.  As iHomeServer runs iTunes as a service, it cannot reliably see mapped network drives.

The simplest way around this is to use fully qualified UNC file naming conventions when adding media to iTunes or when setting up Watched folders in iHomeServer.  For example, instead of adding content from your f:\ (mapped to \\mynas\media), add it directly from the UNC path \\mynas\media.  You can do this either with the server name or IP address (eg \\172.18.1.1\media).

One point to note is authentication.  You may have had to specify an account to access a network resource with when you set up your mapped network drive.  When you use the UNC path, you cannot specify the user account to use.  If your network resource (eg NAS or networked file share) requires authentication the easiest thing to do is to set up an account on the networked resource with the exact same username and password as the account you are using to run iHomeServer.  Authentication will then be transparent and you can access your resources.

Note that some of our users are using drive pooling software, such as DriveBender.  Some of these packages (including Drive Bender) present the storage as a file share instead of a physical drive.  Therefore users tend to map a drive letter to the local file share and access their DriveBender storage via what is effectively a mapped drive letter.  Exactly the same problem occurs in this case - the mapped network drive is still not available to iHomeServer or iTunes.  As above, the workaround here is to use the UNC path to your DriveBender shared folder (eg \\Server\DriveBenderMediaFolder) instead of using a mapped drive letter.

Thanks particularly to one of our users, Jan, for helping get DriveBender working with iHomeServer.

NB: iHomeServer Version 2 validates that the server can see the Watch Folder successfully before allowing you to add a new Watch Folder therefore this should be a lot clearer in this version!


iHomeServer Version 2 - now with native Windows Home Server support - Sneak Preview!

We are pleased to announce that that we are currently in final testing of iHomeServer v2 which is a major upgrade for the iHomeServer application. This will be a free upgrade for all existing registered users.

If you would like to beta test this version please email us at [email protected]


We will announce further details shortly, however, as a sneak preview, the following functionality will be available:

  • Slick User Interface - view Watch Folders, status of indexing, track data, review Cover Art, etc
  • Native integration with the WHS Management Console - support for both Windows Home Server v1 and Windows Home Server 2011
  • View your whole iTunes library and playlists directly within the Windows Home Server Console!
  • Standalone GUI Console for non-WHS Windows editions 
  • Native 64-bit code on appropriate Operating Systems (inc WHS 2011)
  • Manual rescanning of folders or files on demand through the User Interface
  • Different scan modes - watch, poll or manual - available per Watch Folder
  • Essential iTunes playlist management from within the console (inc within the WHS Management Console) - add/remove tracks from playlists, create/delete playlists, etc
  • Metadata editing of iTunes tracks - just like the 'Get Info' button within iTunes
  • Improved set up process - including validating that iTunes or QuickTime is installed
  • Automatic iHomeServer upgrade checking (optional)


 We are currently beta testing this version. If you would like to participate in the beta test programme for this version please email us at [email protected]

How to synchronise your iTunes purchases from one iTunes to another iTunes

When you set up a brand new iTunes media server, you will typically be starting with a blank media library.  Many people will also have another copy of iTunes, say, on a laptop, and they'll use this one to download new content the iTunes store.  How can your server and laptop iTunes installations talk together?


One of the simplest methods is to use iTunes "Home Sharing".  This blog shows how to set this up to:

(a) copy your existing media from your iTunes laptop to your iTunes media server

(b) set up your media server to automatically pull new purchases from your iTunes laptop

Step by step

Setting up Home Sharing

  1. Start iTunes on your laptop
  2. On the Advanced menu, choose "Turn On Home Sharing", the following window will appear: 
  3. Enter your Apple ID and password and press 'Create Home Share'
  4. You'll see a message saying that Home Sharing has been turned on
  5. Go to Edit / Preferences and choose the General tab:
  6. Enter a name in the "Library Name" text box to help identify each of your libraries
  7. Then click on the "Sharing" tab and click the 'Share my library on my local network' check box:
  8. That's the laptop done, now, log on to your iTunes server and repeat the same steps as above (if you are running iHomeServer, remember to stop the service first so you can open a copy of iTunes interactively.)

Setting up automatic transfer of purchases from your laptop to your server

      1. Whilst still on the server, you should now see your laptop's library appear in the SHARED area:
      2. If you want new purchases copied across automatically, left click your laptop's library - it will take a couple of seconds to load
      3. At the bottom right corner of the iTunes screen, a 'Settings...' button will appear. Click it and the following dialog will appear:
      4. In this dialog, select which types of media you want to automatically copy to your server when it detects changes on your laptop
      5. If you are using iHomeServer, you can now close iTunes and restart the iHomeServer agent - iTunes will start automatically in the background

Copying your existing purchases from your laptop to your server

      1. The steps above should mean that new purchases get transferred, however, your existing media will still only be on your laptop
      2. Still on your server, navigate through your 'Laptop shared library' and find the media that you want to transfer (eg click on a playlist, or the 'Music' library)
      3. Select all the items you want to transfer (or press Ctrl+A to select everything)
      4. Then drag and drop your selection over to the relevant area of your server's library (at the top left of the iTunes window) - make sure your mouse pointer has a '+' sign indicating a copy
      5. iTunes will start copying your existing media from your laptop to your iTunes Server

Enjoy!

iHomeserver background media clean-up explained

One of the key features of iHomeServer is that it performs media cleanup in the background.

This was designed because one of the key aims of iHomeServer is to allow you to add, change and delete media on your media server remotely without having to manually tell iTunes about the changes.  If you rename a folder in your media collection, iTunes doesn't know about it. iHomeServer doesn't know that you have done a rename either - however, it does spot new media that it doesn't know about.  Therefore, it will add the new folder name to iTunes.

However, as iTunes doesn't know this was a rename, it will have a duplicate (old) reference to the media in its library, pointing at the original folder.  iTunes is smart enough to know that this folder no longer exists, but doesn't know whether this is temporary or permanent - therefore it leaves it in the library but removes the reference to the file.

iHomeServer scans through the iTunes library looking for files with no references (i.e. where iTunes cannot find the source media file), and automatically removes the stubs from your iTunes library.  This allows you to move content around within your Watched Folders and iTunes will keep in sync automatically.

The one disadvantage of this cleanup is that if you store your media on removable storage (or storage that is not guaranteed to be there, like a NAS), if the clean-up occurs whilst that media is unavailable, it may be inadvertedly removed from your iTunes library.  When the media comes back on-line, iHomeServer should spot the media and re-add it back to iTunes.  However, if you want to avoid this behaviour, you can disable the cleanup by unticking the checkbox "Delete orphaned tracks automatically" in the iHomeServer Configuration tool.

"File not found" error when playing NAS media via Home Sharing

If you are using a NAS drive to store your iTunes media, you may get a "File not found" error when trying to access content via Home Sharing and when running iTunes under iHomeServer, but no error when running iTunes interactively.

This can happen if you have mapped network drives and added content from those mapped network drives to iTunes.

The problem is that these mapped network drives are made available to your interactive desktop by Windows explorer.  When iTunes runs interactively, explorer.exe is running in the same session as iTunes and therefore iTunes can see these network locations.  When iTunes is run by iHomeServer, it is run in a background session dedicated to Windows services.  This session does not run explorer.exe and therefore does not have access to the mapped network drive letters.

The simplest way around this is to use fully qualified UNC file naming conventions when adding media to iTunes or when setting up Watched folders in iHomeServer.  For example, instead of adding content from your f:\ (mapped to \\mynas\media), add it directly from the UNC path \\mynas\media.

The ability to set up mapped drives for iHomeServer iTunes instances may be added in a future version, if there is sufficient demand - so please let us know your thoughts!

iHomeServer Version 1.2.3 released - now with iTunes 10.5 support

We are pleased to announce the release of Version 1.2.3 of iHomeServer.  There are two major improvements in this version:

- Support for iTunes 10.5 (including the wireless sync functionality for iOS 5 devices)

- Better power management supports

iTunes 10.5 has new features that allow it to wirelessly sync with iOS 5 devices - this functionality is supported by iHomeServer so now that your iTunes is "always-on", you'll be able to sync reliably all the time.  This adds to the benefits of iHomeServer, which already supports iTunes' AirPlay and HomeSharing functionality.

Previous versions of iHomeServer would poll your watched media folders every 15 minutes to look for changes.  Some users reported that this prevented disks from spinning down, therefore, the media change detection process has been redesigned to wait for Windows to notify of changes rather than to poll for them.  The Windows notification process is not perfect, therefore iHomeServer will still perform a full re-scan daily.

You can download the latest version of iHomeServer here.  The new version can be installed over the top of any existing versions.

Please email us if you have any issues with this update at [email protected]

Full release notes are available here

UPDATE: Some WHS users have reported that iHomeServer is not indexing video files with iTunes 10.5. This appears to be because iTunes 10.5 on WHS does not automatically install QuickTime correctly. Therefore if you experience this problem, you should manually install QuickTime on your WHS box before indexing your files with iHomeServer.

Using iTunes on a Server without a Sound card

In earlier versions of iTunes, iTunes would steadfastly refuse to run on systems that did not have a sound card installed.  Kind of makes sense - why would you want to run iTunes on a computer that didn't have a sound card?

Well, there are two great reasons that I can think of - AirPlay and "Home Sharing".

With AirPlay, you don't need to use the speakers in your computer.  Instead you can stream your iTunes music/media to any other AirPlay enabled device in the house.  Therefore if you are using your server-based iTunes installation to stream to other AirPlay speakers, there's no need to have a sound card in your computer.

Secondly - "Home Sharing" lets you maintain one single master iTunes library which you can then access from your other iTunes / iOS devices.  Again, if iTunes is acting as a media server rather than a media play, there is no need to have a sound card installed.

The current version of iTunes installs ok on a Windows machine without a sound card, however, when you start it up you will get a message box saying the following:

iTunes has detected a problem with your audio configuration.  Audio/Video playback may not operate properly.

If you have tried to put together a script, maybe using srvany.exe, to run iTunes as a service, this will stop you dead in your tracks as iTunes won't initiate properly until this message box has been dismissed.

iHomeServer for iTunes solves this problem.  iHomeServer runs iTunes as a service and monitors all the iTunes windows in the background.  Whenever it detects a message box such as the one above, it will automatically try to handle it with the most appropriate action.  This works for audio/video problems, screen resolution warnings, iPod service issues, etc.  

iHomeServer does way more than just that though - it's a complete solution for running iTunes on a server.  Optimised for Windows Home Server v1 & 2011 (but compatible with most other Windows platforms), it brings iTunes library and playlist management directly to your WHS Console!  Find out more about iHomeServer here.